6 RV Interior Ideas to Make Your Rig More Homey
Share article
Sandra Crespo and her family make up the “Class Clan” of 1st Class RV Adventures. They have been full-time RVing since July of 2016 when they sold almost everything they had to trade it for life on the road. Wanting to “collect experiences, not junk,” they strive to create their own freedom by traveling the country and spreading their passion for adventure while helping others dream bigger. Over the course of RV ownership, they’ve learned the importance of making their home on wheels their own, renovating and refreshing their RV interior to make it a personalized space they love.
by Sandra Crespo of 1st Class RV Adventures
Are you tired of the brown-on-brown color scheme in your RV? Or are you just ready to make your RV feel more like a home on wheels? When we first purchased our RV, it was every shade of brown you can possibly imagine. From light brown wallpaper and window cornice boxes to brown couches, cabinets and floors. Seriously, everything was a shade of brown.
After four years of calling our RV our home on wheels because we lived in it full-time, we were ready for a change and decided to make it more our style while also making the space feel bigger by incorporating lighter colors.
We learned a lot in the process and have put together our top six RV interior ideas to help make the process a little simpler for you and help you avoid some of the mistakes we made.
1. Hang shiplap on your walls.
One of the first interior upgrades we did was put faux shiplap on some of our walls in the main living area and in the entire toy hauler area. Honestly, the shiplap is one of my favorite things we did during our remodel, and it was so easy to paint.
To create this look, we bought a few under laminate boards for subfloors (about 1/8” thick). While at the hardware store, we had them cut the boards into 8” wide pieces. Back at our rig, we placed liquid nails on the back of each board before putting them up on the wall, then used a nail gun to set each piece into place.
You can get as creative as you want when hanging faux shiplap. You can lay it horizontally or vertically and you can choose whether to paint it or not. The only thing you want to keep in mind is how much extra weight you can add to your RV before throwing shiplap up on every wall. Our fifth wheel toy hauler has three axles and at the time, we didn’t have any toys we carried in our toy hauler area, so we had plenty of extra weight available.

2. Spray a fresh coat of paint.
Painting the cabinets, walls and ceiling can make a world of difference in an RV. The key is to prep everything first. Trust us – if you do not prep, you will regret it. We chose not to hand roll our paint, so we ended up renting a paint machine from a local hardware store. From our past experience in the construction field, we prefer the look of spray as opposed to hand rolling paint.
Prepping for Paint
This was our supply list to prepare the cabinets and walls:
- TSP (Trisodium Phosphate)
- Gloves
- Sponges
- Washcloths
- A box of plastic sheeting
- Blue painter’s tape
The first thing we did was clean the cabinets and walls with TSP using sponges and washcloths. Take the time to thoroughly clean everything and ensure you do not have grease, dust or dirt left behind. I recommend using gloves to protect your hands while using the TSP. Once everything is clean, you can let it air dry or you can dry it with a clean towel. Make sure that the towel you use doesn’t leave any lint behind.
After cleaning everything, we used the plastic sheeting and painter’s tape to cover the floors, windows and anything we didn’t want to paint like doorknobs, light fixtures, outlets boxes, fireplace, speakers, etc. We also chose to take down the cornice boxes around the windows and hang curtains when we were done painting.
Primer
Our biggest tip when choosing a primer is to choose one that will grip well because usually RV cabinets are not real wood and without a good grip, the paint will scratch off easily and you will find yourself having to paint everything again in the near future. We personally prefer the Zinsser® Bulls Eye 1-2-3® primer because it has a great grip, and it created a great surface for the actual paint.
We ended up spraying two coats of primer on everything because after the first coat dried, we felt it could use one more coat to make the surfaces more even (especially the cabinets and wallpaper areas).
If you opt to use a spray paint machine, we recommend buying a five-gallon bucket of primer because one downfall of the machine is that it will use a lot of paint.
Paint
The only paint we recommend is the semi-gloss HGTV Home® paint. We have used this for several other remodels we have done, and this paint will stick to RV cabinets and the wallpaper. The semi-gloss is also easy to clean, which we know first-hand because we chose to go for white and we have three kids!
FYI – Magic erasers have been our best friends with kids and white walls.
Once the primer was fully dry, we went in and sprayed everything down with the first coat of paint. After giving it enough time to dry we then sprayed everything a second time. When painting the cabinet doors, we recommend bringing them all down and spraying one side first and then the next side during the second spray session. You can prop the cabinet doors either along the bottom of one of the walls or set up a space on the floor where you can line them up to spray them.

3. Install new hardware.
You can use your old hardware if you like it, or you can opt to buy new hardware. When shopping for hardware, do not make my mistake and forget your old hardware at home. Bring the hardware with you to ensure that the holes align with your old hardware.
Once everything is dry from painting, you can put the new hardware on the cabinet doors, then hang the doors back up on the cabinets. This is a lot easier to do with two people – one can hold the cabinet door while the other person screws it in place.
This is an RV interior upgrade you can do without painting the cabinets if you do not want to go through the hassle of painting but want to change out the hardware for a new look.
4. Upgrade your floors.
We changed our floors and ripped out every piece of carpet we had. Although we chose a luxury vinyl plank RV flooring that does not require glue, we will pick vinyl planks that glue down instead of locking into place the next time we update our floor. We learned (the hard way) that the areas with slides shift the current planks and have caused some of them to crack in the seams.

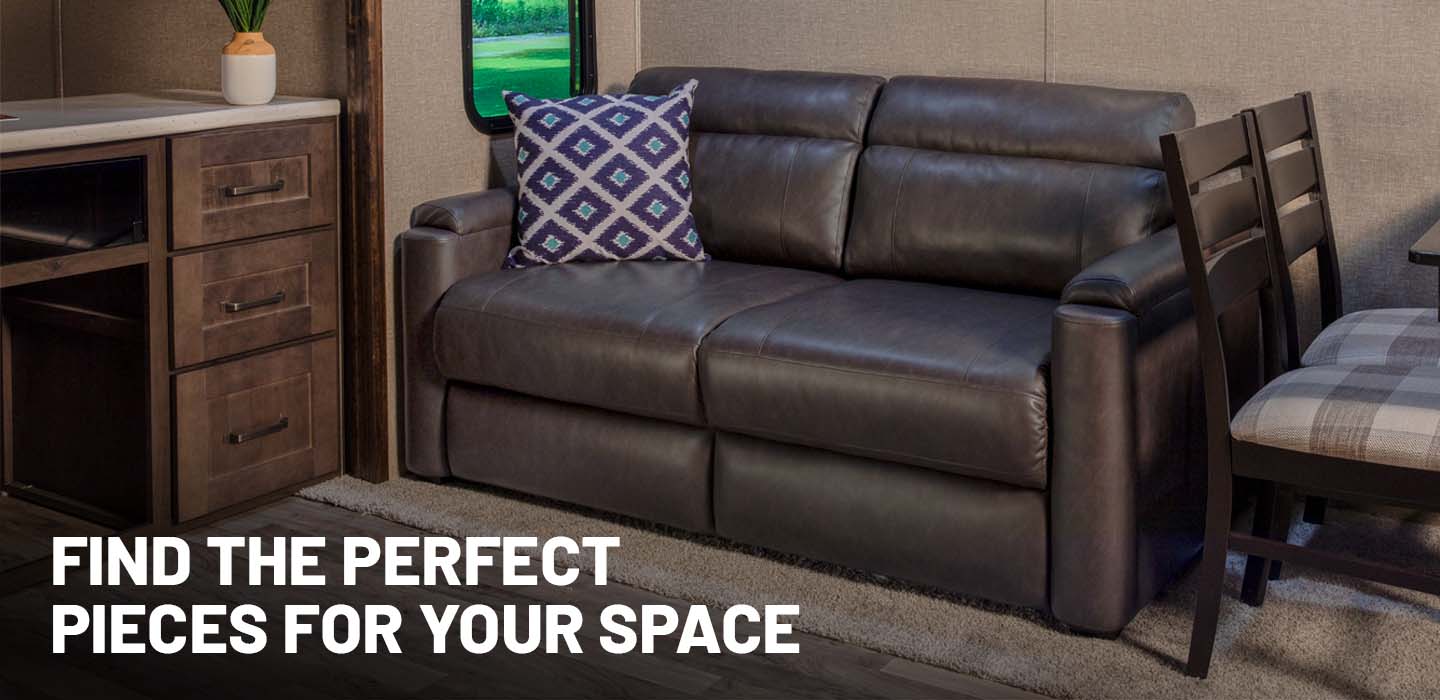
5. Change your furniture.
Changing out our RV furniture is another upgrade we did that we love because it allowed us to add our touch. We exchanged three of our recliners for a custom, high tabletop where we can use it to work (while we look out the window) or to eat.
Our new couches are from the Lippert Seismic Series, and they are super comfy. The great thing about these is that you have plenty of options. After you choose your right and left-hand recliner, you can either opt for a center console or choose as many armless recliners as you want in between the right and left recliners. The Seismic Series also comes with all the bells and whistles like massage capabilities, heat, lights, cup holders and extra options you can add such as a side table, wine glass holder, reading light and one of our favorite accessories – a fan.
If you want to read more about upgrading our RV sofa, check out our blog post titled “RV Sofa Upgrade: Thomas Payne Collection from Lippert.”
6. Apply a new backsplash.
We found a perfect alternative to traditional backsplash options that didn’t add too much weight to our RV. Tic Tac Tiles makes some really good quality peel and stick backsplash tiles. There are plenty of design options available as well. To date, none of our Tic Tac Tiles have fallen down, and we have not only used them in our kitchen but in our bathroom upgrade as well.
When you are applying your backsplash, we recommend using a 3M spray adhesive to help the tiles stick longer. The first set of Tic Tac Tiles did not stick for us (granted this was before we painted so there wasn’t as much grip), but for the second set, we used the 3M spray adhesive and had zero problems. If you choose to do this upgrade without painting your RV, just take the time to prep the surface by cleaning it well to ensure the glue sticks to the walls.

Ready to make your RV feel more like home with these RV interior ideas? Whether you are a weekend warrior or you RV full-time like us, you should take the time to upgrade and renovate your RV so that it feels relaxing and refreshing to you.
We hope we have inspired you to go browse through some color schemes at your local hardware store and choose the aesthetic that fits your style and personality best. You can also browse around Pinterest and create a board specifically for your remodeling ideas and design inspiration.
What RV interior upgrades will you be making to your rig this season?